15 senior night shirt ideas for players and their support crew
Choose the people and the message before choosing a font. A player may want a large number. A manager may want a role. A supporter may want a simple school name without a family label. Offer a no-name version with the same care.
These are original layout ideas, not photos of tested garments or past customer orders. Use the free design and order sheet to check proofs, sizes and the full cost. Shirts can be optional; they should not decide who gets recognized.
Start with the print proof
Ask the printer to show the front and back on the exact garment style and color. Check the size of the printed art, not just how it looks on a laptop. Confirm whether each extra color, print location or unique name changes the quote.
Use the exact product’s size guide. Custom Ink’s sizing guidance points buyers to garment-specific measurements. A size label from one shirt is not a fit promise for another. Check adult and youth styles separately, and use a sample when one is available.
1. Small front, shared senior roster
For players and staff, use a small school/year mark on the front and the approved senior roster on the back. Choose each person’s approved display name.
A long roster needs a real-size proof to stay readable. Count names before asking the printer to size the back art.
2. One senior, one number
For a senior who wants a personal shirt, use a small SENIOR label on the front and one large number on the back. Use the checked number or a role label.
Separate back files make proof tracking more work. Get the price and proof process for each unique back.
3. Support crew
For any chosen supporter, use SUPPORT CREW on the front and a shared school/year line on the back. A supporter can add an approved senior name or keep it general.
A general version welcomes people without naming a family role. Confirm whether named and unnamed backs can share the same order.
4. Class year only
For seniors who want a no-name design, use a small class year on the front and larger year digits on the back. Keep names and numbers off both sides.
This offers little personal detail but avoids a public roster. Ask for a proof of the digits at the actual print size.
5. Signature space
For a team that wants handwritten notes, use a small team/year mark on the front and a wide blank panel on the back. Each senior decides who may sign.
Writing needs time and a suitable marker; it is not ready-made printed art. Ask the printer about the fabric and test a marker on a spare or sample.
6. A short approved memory
For a senior or small group, use school/year on the front and one short approved phrase on the back. Use a true memory the senior is happy to share.
A phrase needs context and permission; an inside joke may not travel well. Have the senior approve the exact wording before the printer sees it.
7. Manager and student staff edition
For recognized student managers and other approved roles, use SENIOR on the front and an approved role on the back. Use the student’s chosen role wording instead of a jersey number.
The design should receive the same care as the player version. Include these copies in the first quote and proof list.
8. Minimal sleeve detail
For someone who prefers a small mark, use a small school mark on the front and a simple year on the back, with an optional sleeve line. Keep the sleeve to a short approved word.
A third print location adds another placement to check. Ask whether sleeve printing is available on the chosen style and how it is priced.
9. One school, several teams
For a school-wide senior group, use school/year on the front and approved team names on the back. Use team names rather than individual names.
The design can include many students without a long personal roster. Confirm the final team list and each group’s permission before quoting.
10. Handwritten-name concept
For a senior who wants a personal but simple mark, use a small class year on the front and a student-approved handwritten name on the back. The student supplies or approves the name art.
Thin handwriting may not read well at a distance. Ask the printer to check the line thickness and show a proof.
11. Two-color number outline
For a player or numbered role, use school/year on the front and a large outlined number on the back. Use a checked number and optional short name.
The outline needs contrast against the actual shirt color. Get a quote for the colors and a proof on the chosen garment shade.
12. Photo-free memory icons
For a team with a shared story, use a simple school/year front and two or three original icons on the back. Use approved symbols for real shared moments.
Icons can become clutter; keep the meaning easy to explain. Confirm original art rights and the smallest line/detail the printer can use.
13. Thank-you team edition
For seniors thanking their support people, use a short THANK YOU on the front and school/year on the back. Leave space for a short approved team phrase.
This shifts the message toward the group; some seniors may prefer a personal version. Approve the exact phrase and quote both sides together.
14. Shared front, choice of back
For a group with mixed privacy preferences, use one common school/year front with a choice of number, role or plain year on the back. Let each buyer choose from a short fixed menu.
Choice is useful, but too many options can cause packing errors. Use an order code for each back and have the printer confirm the sorting plan.
15. Next-season handoff
For seniors making a small team keepsake, use a class-year front and one approved piece of advice on the back. Use a short original line the group agrees on.
Long advice turns into tiny text; shorten it before layout. Check the final line at print size and keep the design separate from official team uniform art.
Three original front-and-back concepts
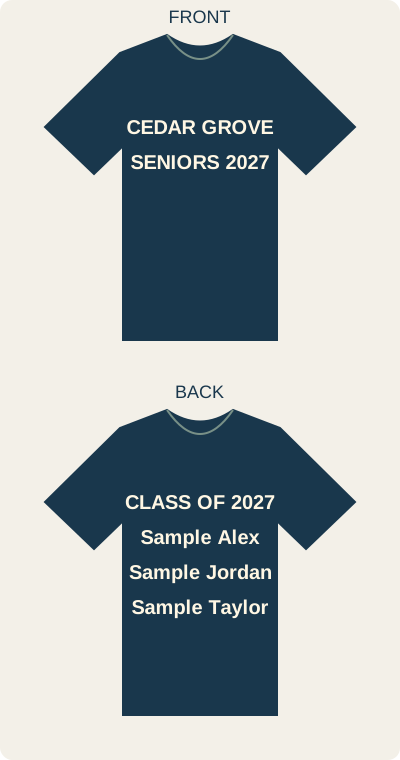
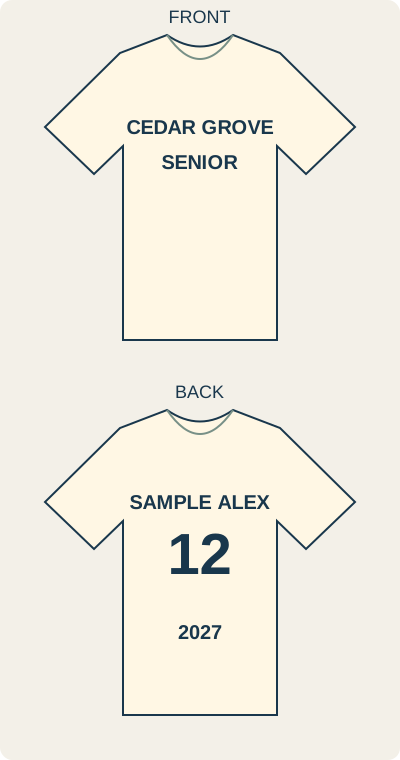
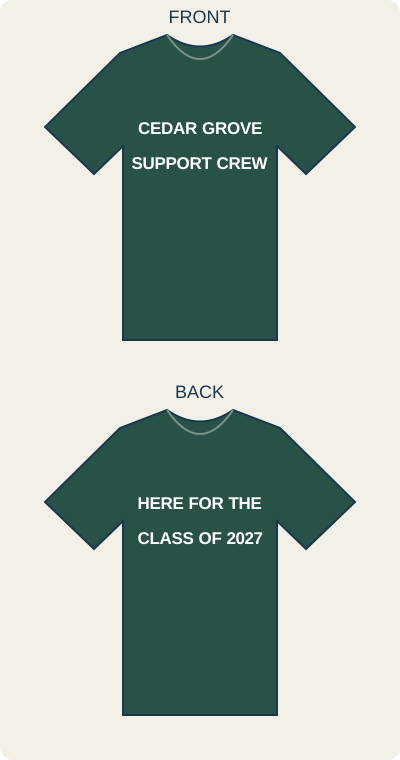
Each pair uses fictional Cedar Grove and class 2027. They are layout concepts, not real garments or school-approved art. The printer must confirm scale, colors and placement.
Shared roster: front “CEDAR GROVE / SENIORS 2027”; back “CLASS OF 2027” with fictional “Sample Alex / Sample Jordan / Sample Taylor.” Get approval for every real name before using this idea.
Individual number: front “CEDAR GROVE / SENIOR”; back fictional “SAMPLE ALEX / 12 / 2027.” Replace the number with an approved role when that fits the senior better.
Support crew: front “CEDAR GROVE / SUPPORT CREW”; back “HERE FOR THE CLASS OF 2027.” This version has no student name or assumed family role.
Include covered shirts in the cost
Here is a made-up example, not a supplier quote. Twenty-four paid shirts at $18 bring in $432. If the group orders 30 shirts, including six covered copies, at a quoted $12 each, the shirt cost is $360. Add $30 for setup and shipping: $390 total. That leaves $42 before any missing taxes or fees. Count every shirt ordered, even when its wearer does not pay.
Confirm production time and shipping time separately. Write down when the clock starts, who approves the proof and what happens if shirts arrive late. Use the event plan in the senior night guide to set the needed-in-hand date. For wider garment options, see custom team shirts.
Free senior night shirt order sheet
Copy or print this before collecting orders. Keep a checked proof beside the final quantity list so the printer and order lead are working from the same version.
Senior night shirt design and order sheet
Free to copy or print. Keep the filled size and name list with the adult order lead. No purchase is required for senior recognition.
1. Choose and approve the design
School/team, class year and event date: ____________________
Adult order lead and backup: ____________________
Audience and design choice: ____________________
Front wording and position: ____________________
Back wording and position: ____________________
Extra print location, if any: ____________________
No-name option: ____________________
Public name/art permission checked by: ____________________
Final names, numbers and roles checked by: ____________________
Final proof version and approver/date: ____________________
2. Use the exact shirt and size chart
Supplier and exact garment/style: ____________________
Adult/youth or other styles quoted separately: ____________________
Product size-chart link or printed copy location: ____________________
How to measure, from that chart: ____________________
Sample available and person checking it: ____________________
Shirt color and print colors: ____________________
Minimum quantity and unique-back charges: ____________________
Production time begins after: ____________________
Shipping time and promised arrival date: ____________________
Needed-in-hand date and backup if late: ____________________
Use private order codes. Confirm the size from the chosen product chart; do not turn an old uniform size into a new shirt order without checking.
Scroll sideways to see all columns.
| Private order code | Exact style and size | Back option / approved text | Paid or covered | Proof checked |
|---|---|---|---|---|
| ______ | ______ | ______ | ______ | ______ |
| ______ | ______ | ______ | ______ | ______ |
| ______ | ______ | ______ | ______ | ______ |
| ______ | ______ | ______ | ______ | ______ |
More rows kept at: ____________________
Total paid shirts ______ + covered shirts ______ = total ordered ______
Covered-shirt funding source confirmed: ____________________
3. Check the money and delivery
Use one line for each style or back option with a different price. Count covered copies even when their wearers pay nothing. Repeat these lines as needed.
Style/back price group: ____________________
Paid shirts ______ + covered shirts ______ = group quantity ______
Actual amount collected for this group $______
Group quantity ______ × quoted unit cost $______ = group shirt cost $______
Total receipts (add each group’s actual collected amount) $______
Total shirt cost (add each group’s shirt cost) $______
Setup/personalization not included above $______
Shipping/taxes/payment fees not included above $______
Other quoted costs $______
Total cost = shirt cost + remaining charges $______
Separate covered-shirt funds NOT already included in receipts $______
Total available funds = receipts + separate covered-shirt funds $______
Available funds $______ − total cost $______ = balance $______
Count each payment once too. If a sponsor payment is already in receipts, do not add it again as covered-shirt funds. Count each charge once. If the balance is negative, settle the gap before ordering. Extra cash is not guaranteed profit if any charge is still missing.
Who pays the printer and when? ____________________
Last date buyers may change names or sizes: ____________________
Wrong print, damage, missing order and replacement terms: ____________________
Late arrival or canceled-event terms: ____________________
Who checks the delivery against private order codes? ____________________
Pickup location/date and unclaimed-shirt owner: ____________________
Receipt and final-cost owner: ____________________